Jo-Ann Spooky Spaces

I was really excited and surprised when a big box of mixed supplies from Jo-Ann arrived with my theme. I’m still thinking about projects for all the goodies they sent-so more DIY’s to come. The theme for this DIY was “spooky spaces”. I tried to think about spaces that can some times be over looked when decorating because you might already have a lot going on in those areas (like the kitchen or bathrooms) and some times knick-knacks might get in the way. I finally settled on kitchen and decided to create a spooky paper towel holder. Both Halloween decor & functional.

Paint-I went with Martha Stewart brand because I really like how it actual goes on with one coat of paint. I chose black, white, and orange.
Crackle-I haven’t used a crackle medium since I was a kid and I remembered it being kind of messy and involving two products, but this stuff (also by Martha Stewart) is one product and really easy to use. It is also so much fun for kids (yep adults too) to watch the paint crackle.
paintbrush-you could use small foam brushes too
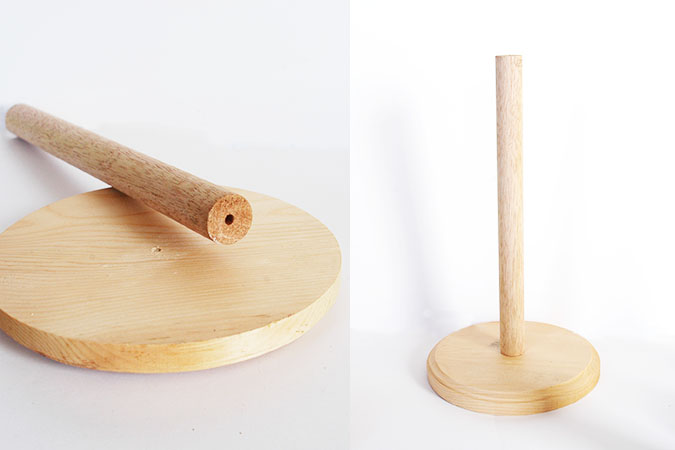
dowel rod– I purchased the largest circumference rod that my Jo-ann had, and cut it to about 11.5 inches high. Most paper towel rolls are 11 inches tall.
Wood wheel– This came in a bag set of 4, and works as the base for our pumpkin head.
Paper Mache Pumpkin-these were on sale right now and also come in a set of four, found in the Halloween area.
Glue-I used a basic all purpose glue, but you could use wood glue, or epoxy.
2 screws-length doesn’t need to be exact but they need to be at least 1.5 inches long
drill
saw– or some other way to cut your dowel rod

3. Paint the wooden wheel, paper towel holder, and pumpkin black, and allow to dry.
4. Once dry brush a layer of crackle onto all three pieces, a generous layer with as few brush strokes as possible. Let dry completely.

6. Once dry cut a small hole in the bottom of your pumpkin, so it can be glued to the top of the wheel.
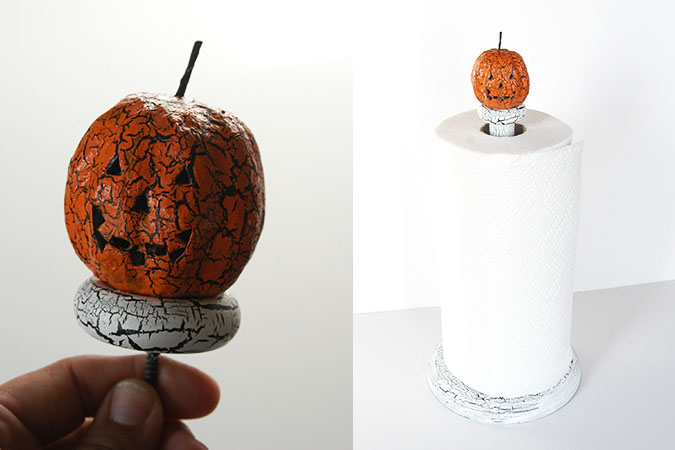
7. Once all the glue and paints are dry you can use your paper towel holder. The top screw slides down into the hole in the dowel rod and does not need to be tightened. It stays in place and then you simple pull up your pumpkin when you want to change the roll.
You can check out even more Halloween DIY’s over here on Jo-Ann’s website and you can print out a 50% off coupon to use at Jo-Ann’s here