
March is national Craft Month, and the folks at
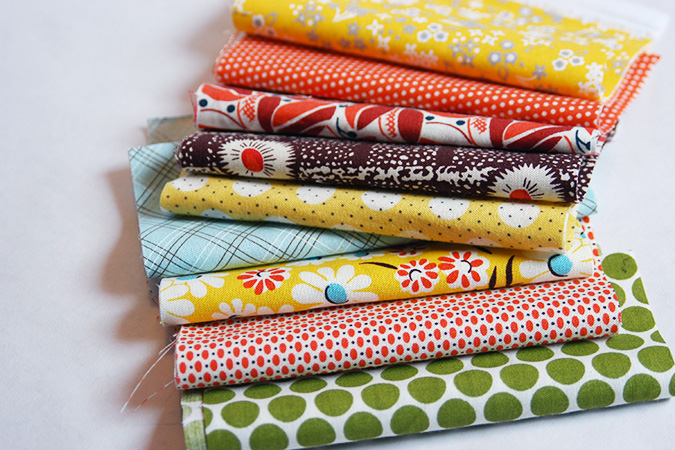
JoÂâ€Ann Fabric And Craft Stores asked me to help celebrate by creating a DIY based on one of the latest Spring Trends. I decided to go with a mix of trends, flowers and geometric. I created a English paper pieced hexagon necklace using bright fabrics that remind me of Spring. My favorite part was picking out the fabric’s at Jo-Ann that I would use.
JoÂâ€Ann makes spring crafting easy during National Craft Month with a
$5 off $25 or more purchase coupon and a
spring crafting inspiration website.
Here’s what you’ll need…
Supplies:
–quilting fabric-You only need a small amount for each hex, but I chose a variety of fabrics and bought 1/8th of a yard of each.
–paper hexagons-Some people like to print these on card stock, but I printed my on plain copy paper.
–scissors
–needle and thread
–iron
–pencil
–scrap piece of felt This is used as a backing for your necklace.
–small silver eyelets I bought the kit that comes with the two tools for applying.
–hammer
–jewelry punch or another tool to create a small hole for eyelet, some of the bigger kits come with a tool for creating the hole.
–needle nose pliers
–jump rings
–chain and necklace closing clasp
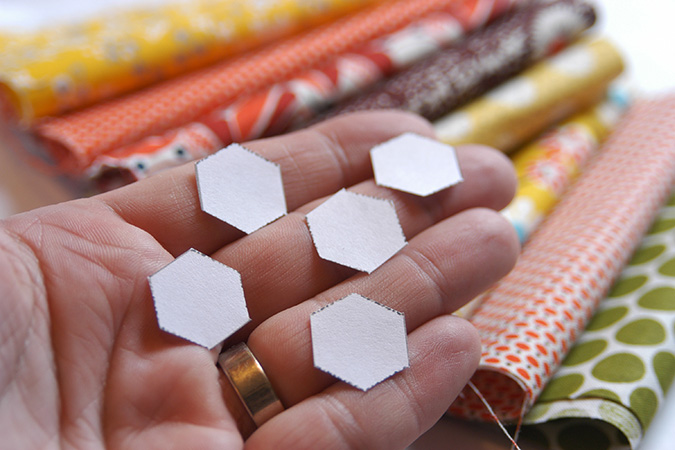
1. Print out hexagon paper pieces and cut out hexagons, this necklace can easily be customized so you might not end up using all the hexagons provided. I wanted to include extra so you have lots of room to play around.

2. Thread your needle leaving a tail and knot the other end, the color of the thread does not matter at this point because this thread will later be cut out. I just stuck with white thread the entire time. Next cut out a small square of fabric that is larger then the paper hexagon. Now Position your paper hex so it is centered on the wrong side of your fabric. You can pin it in place, but sometimes with hexes this small the pin tends to get in the way. Cut your hex out leaving about 3/8 inch seam allowance, it does not have to be exact. You just want to give yourself enough extra fabric to turn under without a struggle.

3. Begin to baste by folding one edge of your fabric down over the paper. Stick your threaded needle in and through the folded down fabric, the paper, and the right side of the fabric. Now you will go back down through the front in the same way (like photo 2) but right before the next folded down edge.

4. Keep stitching all the way around the hex, folding down each edge as you come to it. When you are done the front and back will look like the two hexes above. You do not need to tie a knot to finish it, because these are basting stitches they will come out later. I just finish with a few extra stitches in one place so the thread does not slip out. We just want these stitches to hold the shape of our hexes in place.

5. Once you have a few hexagons stitched you can begin to play around with your layout. Once you have something your happy with I recommend taking a photo that you can reference as you stitch them together.
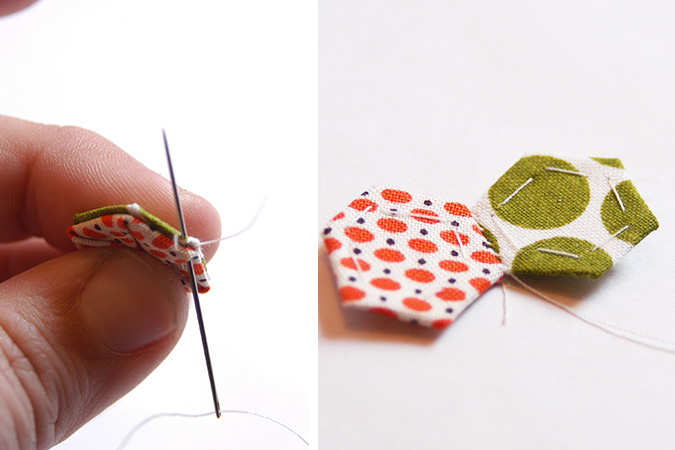
6. Take a threaded needle (these stitches stay in so pick a thread that will not be very noticeable with your fabric choices). Take two of your hexes that meet up in your design and put them with right sides together. I like to start my first stitch in the crevice of a corner, and then whip stitch across till I reach the second corner. You can finish off with a knot, or open up your hexes take a look at which hex will be added next and leave your thread connected, but hidden along the back of your work.

7. Continue to stitch your hexes together in this way and finish off with a knot hidden on the back side. Now I like to iron my hexes on medium heat to help set the folded edges around the outer necklace in place. Now using the tip of your scissors snip the basting threads from the first steps and pull them out. Now at the point when making a quilt using English paper piecing you could pull the papers out. Since the necklace is so small and not something that is going to be washed I just left the paper in place. I didn’t want to have the edges unfold during the process and you cannot tell in the finished necklace.


8. Now to create your back from felt lay your hexes on the felt and trace with a pencil. Cut out along the inside of the pencil lines to create a backing that is smaller then your hexes. You don’t want it to stick out at all. Lay your backing in place and with a threaded needle stitch taking care not to go all the way through the the front of your design. A whipstitch along the edge holds in on perfectly.

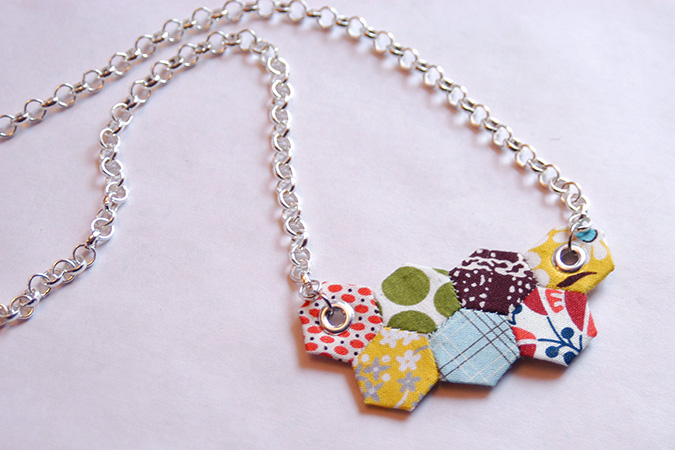
9. Use a jewelry punch or similar tool to create a small hole for your eyelet. Attach eyelet using the kit that comes with it, and following instructions on packaging. Mine was very simple and involved putting the eyelet through the hexes, and hammering it using the two tools that came in the kit. Using your needle nose pliers attach a length of chain to each grommet with a jump ring. Your chain length will vary depending on where you would like your necklace to fall. I like to attach longer chain to each and practice holding the necklace up to get an idea how long it should be. Trim chain as needed and add a closing clasp using the pliers and jump rings.
This blog entry is part of the JoÂâ€Ann Fabric And Craft Stores® National Craft Month campaign. I received a gift card to purchase supplies for this DIY; however, any and all opinions expressed in this entry are my own.