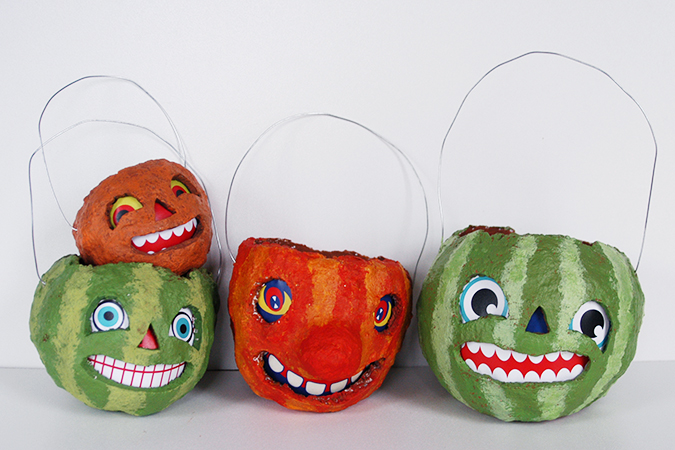
DIY vintage style paper mache jack o’lanterns


First you’ll need to gather your supplies:
–paper mache You can obviously use most any method of paper mache, from newspaper to paper pulp. Since I was making a lot of pumpkins at once I went with celluclay (bright white)
–balloons I would choose a nice bright color so you can make sure you don’t have any thin spots in your paper mache. I had picked white balloons and then once they were popped I had to go in and fill some thin areas.
–paint any sort of craft paint will do
–paint brushes
– 22 gauge wire I found mine in the floral department of Michael’s in a pack of straight lengths of wire, but you can also buy a coil of wire.
–face parts
–glue this is my favorite glue
helpful items needle nose pliers for bending the end of wire, Dremel
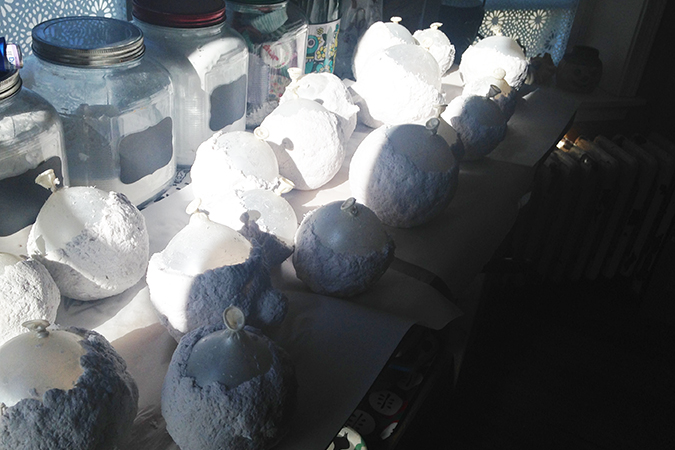
Step one Blow up your balloons to many different sizes and shapes. Its a lot easier to blow them all up first then to try and blow up some more balloons midway when you have paper mache on your hands.
Step two Follow instructions on paper pulp mixture to create your paper mache. I actually liked mine slightly thicker then instructed, so I mixed by feel and would add more paper pulp or water as needed to get the consistency of cooked oatmeal. I found this not only spread easier onto the balloons but stayed put without a lot of sliding around. Coat each balloon leaving a opening around the knot area. Set your coated balloons down on wax/parchment paper to dry with the balloon knot facing up. This will help create a nice flat base/bottom area for your finished pumpkin.
Step three Allow paper mache to dry. This is one of the most time consuming parts. If you have a warm sunny day they dry much faster in the sun. After one day of drying I flipped them all upside down so the bottoms could dry out. After two days I was able to pop all the balloons and let the insides start to dry. Since I used white balloons and had some thin areas I then created more paper mache and went in to fill any open spots. I also used this time to add a much smoother layer on top of each one. During the initial coating paper mache it wasn’t very easy to smooth it around, but once the first layer is done and dry the second goes on a lot easier.


Step four Now comes the fun part! Your pumpkins are completely dry! Now draw a face on your pumpkin and then use a Dremel or X-acto knife to cut it out. Some tips of using the dremel, you’ll want to trace along the lines you’ve drawn slowly grinding away the paper. Don’t push very hard or the paper will start to smoke and burn slightly. It’s best to slowly work away at it. We did find that some pumpkins were easier to cut out the faces with an X-acto blade then others. It just depends on how thick the paper mache is in those areas. If you use the dremel to carve, you can go in and clean up the area with the X-acto blade. If you’ll be making these with kids, I suggest that the kids draw the faces and then adults cut them out. At this time we also used the dremel tool to drill a small hole on each side for the wire handles.
Step five Paint your pumpkin! Using regular craft paint I liked to lay down a layer over brown over all my pumpkin including the inside. Since the surface is bumpy I like to get this into all the cracks and make it all a nice solid brown. Then once its dry to go over it with green or orange and don’t worry as much about getting it down in the cracks as the brown will give it a nice aged look. Let your pumpkin dry fully.

Step six Cut out eyes, a nose and mouth from the files above leaving plenty of white around each, you can try eyes in your pumpkin by holding them in place and seeing which one will work best. I created the noses as stripes of solid color. Use the extra white area to apply some glue sparingly. If you use the paper glue I recommend, you don’t need much and it dries super fast. You simply hold the item inside your pumpkin in place and in about a minute its dry. Once the face is in, you can add a wire handle and your done! I’d love to see if you make any so please share a link in the notes.


Please note that the Amazon links above are Amazon affiliate links and if you purchase something using it I will receive a small Amazon credit.